how to figure out what mode a port is in on a switch
Cisco switches provide outstanding operation, security, scalability, and toll-efficiency for any network type. They are not ordinary plug-and-play devices that do non need configuration or interest when resolving issues. However, Cisco switches practice require an initial setup, ongoing monitoring, and maintenance.
How to configure a Cisco switch? In this step-by-step guide, nosotros'll configure a Cisco Catalyst Switch. Catalyst series is a well-known family of enterprise-grade network equipment, which varies from wireless controllers, switches, and wireless access points. Catalyst switches apply the IOS as their operating system. There are two different interfaces to configure a Cisco switch, via the modern Web Console or through the more versatile Cisco IOS Command-Line Interface.
In this step-by-pace guide on configuring a Cisco switch:
- Inspecting and connecting to your hardware
- Establishing a serial connection
- Moving through command modes
- Initial configuration commands
- Restrict admission to your switch
- Configure your switch ports and VLANs
- Useful additional commands
ane. Inspecting and connecting to your hardware
Before configuring your Cisco switch, you'll need to be able to place the power cable, switch ports, console ports. In addition, all Cisco switches come with LEDs that let you know the electric current state of your switch.
- Connect the switch's power cable to the power source, and expect for the lights to come upwards.
- Check the forepart side of the switch. The switch's (SYST) System's LEDs are as follow:
- Off: The system is not powered. If power cables are connected only LEDs are off, cheque the power source or switch's power cable.
- Light-green: The switch is operational.
- Blinking green: The arrangement'due south software is loading.
- Amber: Power is ok, but the system is not functional.
- Blinking amber: Mistake with either: network module, power supply, or fan.
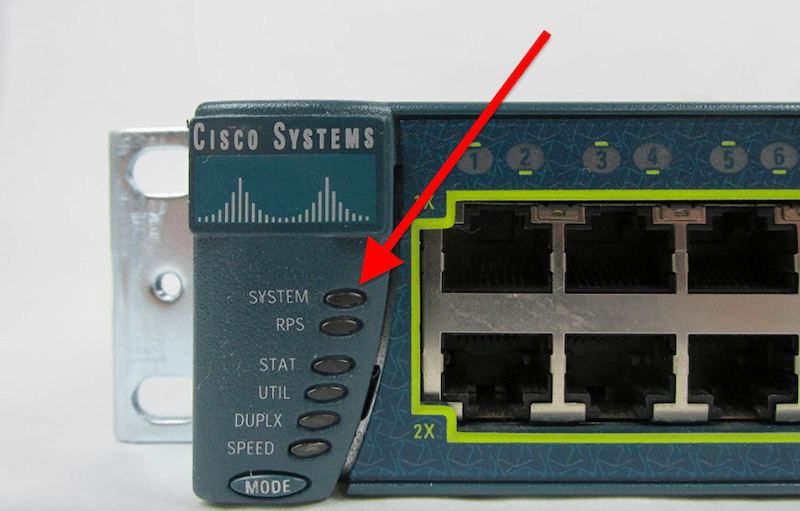
- Check the lights. They vary co-ordinate to the Cisco Switch series, but mostly, you should see the Organization light (every bit displayed above), along with other lights like Console, Active, RPS, Stack, PoE, Duplex, Speed, etc.
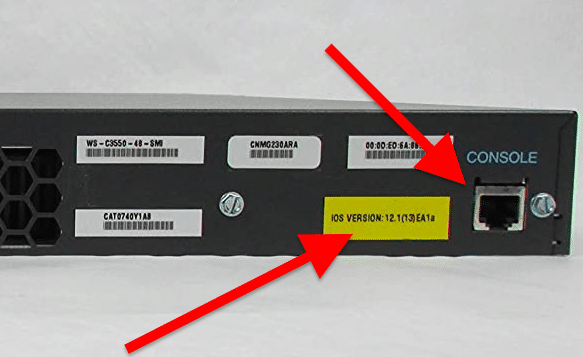
- Check the backside of the switch. Behind the switch, yous should be able to encounter the power supply and console port. The console port of switches can be either, Series or Mini USB. You should also see the IOS characterization on the backside, which shows the operating system version that comes by default.
How to connect to a Cisco Switch?
Connect to the console (management) port using a console cable.
- Depending on the console port of the Cisco Switch, you should use dissimilar adapters. Mostly, there are 2 types of cable adapters: a Serial DB-9/Ethernet RJ45 Console cable (as shown below) and a USB/Serial DB-9 adapter (if your reckoner does non take a serial port).

- How to physically connect your laptop or PC to the console port? Plug the serial DB9 end of the console cable into your estimator's series port and connect the RJ45 end on the Cisco Switch. But if your computer does non have a serial DB-9 port, connect the serial DB9 panel cable cease into the Serial-to-USB adapter and so plug it into your laptop. Acquit in heed that these adapters work with a software driver.
2. Establishing a serial connection
To establish a serial connection to your computer, you'll demand to apply software that controls serial lines. A well-known software that can do this is PuTTy. This software is a free SSH, Telnet, rlogin, and TCP customer. Unfortunately, PuTTy is only supported by Windows. So if you are running Linux or macOS, in that location are some alternatives such every bit SecureCRT and MobaXTerm.
- Ensure you lot are connected to the console port of the Cisco switch using the correct cable, as shown in the previous section.
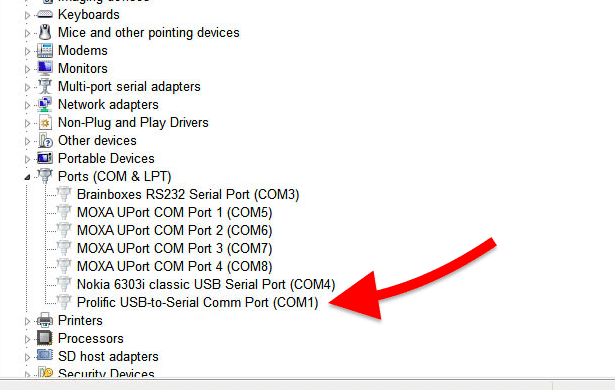
- Expect for the COM (communication port) established past your reckoner. A COM port is the name of the serial port interface on PCs. Information technology refers to physical ports and emulated ports like those of USB adapters. So, if y'all are using a USB/RJ45 adapter, you'll need to observe the COM port. To do this, get to Windows Device Managing director and check your Ports. And so, locate the cablevision (with driver) that you are using and tape the COM number (in this case, COM i).
- Let's configure the serial connexion lines in your computer. Open PuTTY. Go to Configuration > Connection > Serial. Set the following parameters.
- The series line to connect to The COM # you institute in the previous section.
- Speed: varies according to your hardware — 9600 to 115200 (bps).
- Data Bits: viii
- Stop Bits: 1
- Parity: None
- Menstruum Command: None
- Save your connectedness and click on Open. You'll exist instantly connected to the switch.
3. Moving through command modes
Once connected to the switch, you'll exist greeted with the prompt:
Switch>
The hostname "Switch" is the current name of the switch, and the ">" ways you lot are in "unprivileged" command mode. In this mode, you lot'll only be able to display information just non change any configuration. To start configuring your Cisco switch, you'll need to scale your user privileges.
Navigate through Cisco's command modes
At that place are ii privilege level modes:
- The "Unprivileged" User EXEC: ">" is the default mode. Here y'all can but brandish and see certain debug information.
- The "Privileged" User EXEC: "#" configuration mode. At that place are other modes within the privilege way, including global, interface, subinterface, router, and line configuration modes.
To move across these modes, yous can use the post-obit commands
- enable. Change from unprivileged (>) to privileged (#)
- disable. Switch from privileged (#) to unprivileged (>).
- Configure concluding. Enter global configuration mode.
- leave. Revert one fashion.
- terminate. Revert to the privilege enable manner.
4. Initial Configuration Commands
Although switching configuration will vary co-ordinate to the topology, the primary and security blueprint depends on the topology. For example, you can change the hostname, console port, vty ports, etc.
a. Configure an advisable hostname
Enter to the privilege manner (enable) and then configuration manner (config terminal). Then, issue the post-obit command:
Switch(config)# hostname <name>

You lot'll notice that the switch inverse its name from "Switch" to whatever name you gave information technology.
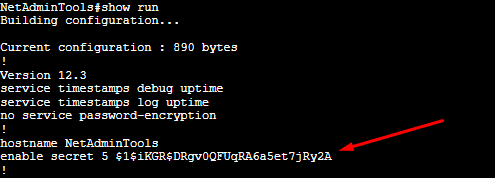
b. Protect the privilege EXEC mode with an "encrypted" password
Protect the privilege EXEC fashion and all sub-modes, including global, interface, subinterface, router, and line configuration modes. Enter global configuration mode and consequence:
enable hugger-mugger <your password>

To exam the new configuration, exit privilege EXEC style and try to reaccess it. First, use the "exit" control then "enable" (as shown in the picture below).
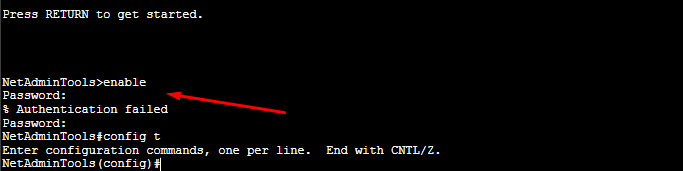
Discover that nether unprivileged User EXEC mode, if you endeavour to enter privileged User EXEC fashion, the console volition ask yous for a countersign. If y'all type the incorrect password, you'll not be able to move to the Privileged User EXEC way.
Yous could take too used:
enable countersign <password>
Only the main difference betwixt "enable secret" vs. "enable password" is encryption. If someone gets their hands on the configuration file (either a printed version or TXT), they could easily find the countersign in apparently text. With "enable secret," the countersign is encrypted with MD5.
c. Configure a direction interface IP
Logging to a switch for management tin can be challenging. First, using the console port requires you to be on-site and side by side to the switch. 2nd, you can't log in remotely to an L2 switch via Telnet or SSH by default. 3rd, layer ii switches won't take IP configuration on their physical interfaces. Then, the only solution is to create a Switched Virtual Interface (SVI) and assign it an IP.
Enter global configuration mode and issue the following prepare of commands:
Switch(config)# interface vlan 1
Switch(config-if)# ip address <ip address> <mask>
Switch(config-if)# get out

d. Configure a default gateway
To make your switch accessible from a remote network using Telnet or SSH, you'll need to configure it with a default router. For example, L2 switches would only need a Default Gateway (DG) with L3 capabilities when they need management from external networks.
To configure a DG on your Cisco switch:
- First, make certain the DG is on the same network.
- DG must have the proper routes to road such packets.
- And so, enter global configuration manner and event the following command.
Switch(config)#ip default-gateway <ip address>

- Employ the "ping" command to test connectivity.
- Always at the cease of your remember to save your configuration with:
Switch# wr
five. Restrict access to the switch
Security is one of the essential tasks when configuring your switch.
a. Protect panel, telnet, and aux ports
When you accessed the switch via the console for the first time, it didn't request a password. To protect your switch from unauthorized access, you'll demand to establish hallmark for all kinds of input connections. Aside from restricting console ports, you'll also need to consider Telnet and Aux ports.
Issue the post-obit commands:
- To find the current connectedness lines on your switch.
Switch>evidence running-config.
- To determine the electric current connection lines and their numbers.
Switch>show line.
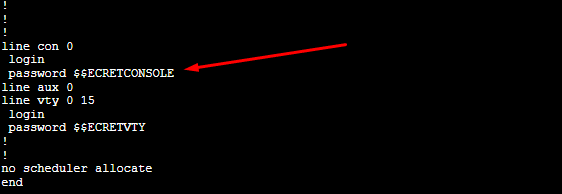
- Configure line console password.
Switch(config)# line con 0
Switch(config-line)# password $$ECRETCONSOLE
Switch(config-line)# login
Switch(config-line)# exit
- Configure line vty password.
Switch(config)# line vty 0 four
Switch(config-line)# password $$ECRETVTY
Switch(config-line)# login
Switch(config-line)# get out
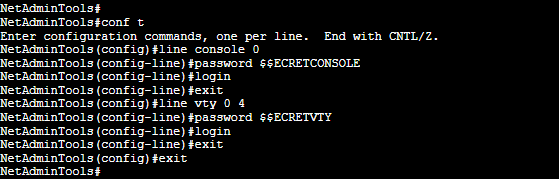
- One time configured, event the "show running-config" again to verify your configuration.
b. Restrict access at the IP level with an ACL
Create an Access Control Listing (ACL) to deny (or permit) access to the switch based on IP addresses. You lot tin allow access to a single IP or deny access to an entire network with an ACL. Once created, you can assign the new ACL to the VTY line and protect Telnet access.
Upshot the following commands:
- Create an ACL.
Switch(config)# ip access-list <number> <let|deny> <ip accost><wildcard>
- Y'all tin can also create standard ACLs with the post-obit set of commands.
Switch(config)# ip access-list standard TELNET
Switch(config-std-nacl)# allow <IP-one>
Switch(config-std-nacl)# permit <IP-2>
Switch(config-std-nacl)# go out
- Assign the new ACL to the VTY line.
Switch(config)# line vty 0 4
Switch(config-line)# access-grade <access-list number> in
Switch(config-line)# exit

The example set of commands on the screenshot will do the following: The Access list number 101 defines "permit" to the IP address 192.168.20.1. Although no "deny" has been described in the ACL 101, all access lists cease with an implicit "deny all." If the traffic going through the ACL 101 does not match the rules (if IP is not 192.168.20.1), all traffic is ultimately dropped. Finally, this ACL is attached to the VTY (Telnet connections) 0 4, and so nobody except 192.168.20.i can connect to the switch via Telnet.
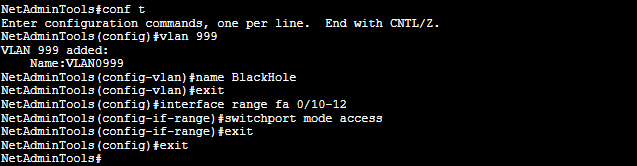
c. Disable unnecessary switch ports (or assign them to a Blackhole VLAN)
Although this footstep is non mandatory, information technology is highly recommended. As a all-time security practice, disable all unused ports using the "shutdown" command. Let's suppose our switch has 48 switch ports and that nosotros are not using ports from 18 to 48.
Switch(config)# interface range fa 0/eighteen-48
Switch(config-if-range)# shutdown
Switch(config-if-range)# exit
Switch(config)#
An alternative to shutting downwardly ports is creating a "black hole VLAN" and assigning them all unnecessary switch ports. As a general rule of thumb, it is recommended to assign switch ports (used or unused) to any VLAN, except VLAN one. If any of these ports are yet on the default VLAN 1, and the port is enabled, it might expose user broadcast or multicast traffic.
Create a black hole VLAN and assign all unused ports to it
Switch(config)#vlan 999
Switch(config-vlan)#name BlackHole
Switch(config-vlan)#leave
Switch(config)#interface range fa 0/18-48
Switch(config-if-range)#switchport access vlan 999
Switch(config-if-range)#switchport mode access
Switch(config-if-range)#leave
Recollect to relieve your configuration with:
Switch# wr
Configure your switch ports and VLANs
One of the most critical functions of a Layer ii Cisco Switch is to segment the network into unlike L2 VLANs, where each of these VLANs belongs to a split up L3 subnet.
Switch ports are by default assigned to VLAN ane, so yous'll need to create additional VLANs and assign the physical switch ports accordingly. As mentioned in the previous section, avoid using the VLAN 1 for user traffic.
Let'due south create two VLANs and assign the physical switch ports to each of them. Retrieve that we have already disabled (or sent to blackhole VLAN) some portion of our switch ports.
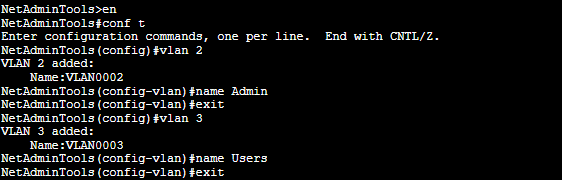
Use the following commands to create VLANs:
Switch(config)# vlan 2
Switch(config-vlan)# name Admin
Switch(config-vlan)# exit
Switch(config)# vlan 3
Switch(config-vlan)# name Users
Switch(config-vlan)# exit
Assign the concrete switch ports to each VLAN
Switch(config)# interface range fa 0/1-3
Switch(config-if-range)# switchport mode access
Switch(config-if-range)# switchport access vlan 2
Switch(config-if-range)# exit
Switch(config)# interface range fa 0/four-17
Switch(config-if-range)# switchport mode access
Switch(config-if-range)# switchport access vlan three
Switch(config-if-range)# exit

Save your configuration with:
Switch# wr
vii. Useful Additional Commands
Later on following the bones Cisco switch configuration shown in the previous sections, you can use the boosted commands to monitor and troubleshoot your configuration.
a. Displays the current configuration
Switch# show run
b. Show the current MAC accost table.
Switch# prove mac accost-table
c. Shows all interfaces, their configuration, and the status.
Switch# evidence interfaces
d. Displays the status of all interfaces, including parameters similar speed, duplex, and more than.
Switch# show interface condition
east. Shows all the VLAN numbers, names, and their associated switch ports.
Switch# show vlan
Source: https://www.netadmintools.com/how-to-configure-cisco-switches/
0 Response to "how to figure out what mode a port is in on a switch"
Post a Comment